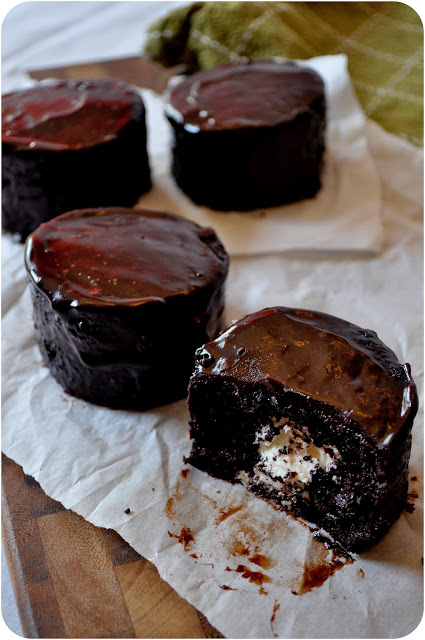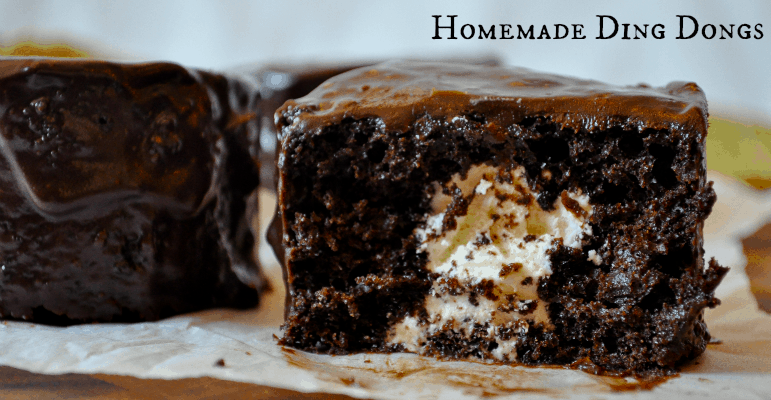
Me and my big ideas, right? Sometimes, there’s a reason that desserts are mass-produced in huge factories with their fancy ding-dong shaping machines and magical ding-dong dipping pools full of chocolate. They probably even have their own version of Oompa-Loompas, perfectly injecting each one with just the right amount of marshmallow cream.
I just have little old me. And a three-year-old helper – who happens to love marshmallow cream – and ALWAYS, ALWAYS manages to drop a spoon, beater or spatula dipped in the stuff on the floor. But, before it hits the floor, it bounces off the counter top, the bar stool, her leg, her foot, the kitchen island and the dog.
Ok, in all honesty, these really weren’t that hard. They were just super time consuming and tedious. You start by baking two cakes, then allowing them to cool completely. Then, you have to use a biscuit cutter to shape the rounds, cut cones out of the bottom of each one, fill them with cream, replace the cone and then, the hard part. Frosting them.
It seems like you should just be able to spoon ganache over the top and let it run down. Doesn’t work. A pastry brush works, but it picks up all of the crumbs from the cake. So, I used my small offset spatula and hand frosted each one.
That was fun.
Actually, it was a little bit fun. But I’m one of THOSE people who enjoy things like that.
Next time, I’ll make a ganache that hardens completely. This one stayed pretty soft and they were a bit of a mess to eat. I might also frost them first and then inject the filling from the bottom after they’ve set up.
Live and learn. But all in all? Worth it. The cake is spongy and uber-moist, and the chocolate ganache cuts the sweetness of the cream filling.
Give them a try, I know you’ll love them.
Enjoy!
- • 1 and ⅔ cups all-purpose flour
- • 1 cup unsweetened cocoa powder
- • 2 cups sugar
- • 1 and ⅓ teaspoon baking soda
- • ½ teaspoon baking powder
- • 1 teaspoon salt
- • 2 ounces semi-sweet chocolate, chopped
- • 1 cup hot, brewed coffee
- • 2 eggs
- • ½ cup vegetable oil
- • 1 cup buttermilk
- • ½ teaspoon vanilla extract
- • 7 oz marshmallow creme/fluff
- • 3 and ½ cups confectioners sugar
- • 1 teaspoon vanilla extract
- • 12 Tablespoons unsalted butter, room temperature
- • 3 Tablespoons heavy whipping cream
- • 12 ounces semi-sweet chocolate
- • 1 cup heavy cream
- • 1 Tablespoon unsalted butter, room temperature
- Preheat oven to 300 degrees (F). Prepare two 9-inch round cake pans by spraying with cooking spray, then lining with parchment, then spraying parchment with cooking spray. Set aside.
- Chop chocolate into small pieces and place into a small bowl. Brew coffee, then pour hot coffee over chocolate. Whisk to combine, stir until the chocolate is melted. Set aside.
- In a large bowl, sift together dry ingredients: flour, sugar, cocoa powder, baking powder, baking soda and salt. Set aside.
- In another large bowl, using an electric mixer, beat eggs until pale yellow. Add oil, buttermilk, vanilla and chocolate/coffee mixture. Beat to combine.
- Pour dry mixture into wet mixture and beat until just combined. Don’t over-mix. Evenly divide batter between the two cake pans (I use a kitchen scale to be precise) and bake for 40-60 minutes or until a cake tester comes out clean. The original recipe suggests 60 minutes, but mine was ready at 45 minutes.
- Cool cakes in their pans on wire racks until completely cooled. Run a knife around the edge of the pan and release the cake.
- In a medium bowl, combine all ingredients. Use a hand mixer to beat for two minutes or until mixture is light and fluffy.
- In the microwave, heat cream in a medium glass bowl until steaming but not boiling. Pour chocolate into hot cream, and allow to sit for 1-2 minutes. Stir chocolate with a small whisk or fork until smooth. Add butter and stir until melted.
- Using a two-inch biscuit cutter, carefully cut seven rounds out of each cake. Place rounds upside on a large baking sheet lined with parchment paper.
- Using a sharp knife, carefully cut out a cone of cake from the bottom of each round. DO NOT discard these cones; you will need to replace them after filling.
- Carefully fill each cake with a spoonful of marshmallow topping. Replace the cone.
- To “glue” the cone back in place, spoon a small amount of ganache on to each cake, and spread into a thin layer on the top of the cake only. Place cakes into refrigerator for 15 minutes to slightly harden the ganache.
- Remove cakes from the refrigerator. Using a small offset spatula, spoon or pastry brush, coat the top and sides of each cake with a generous layer of ganache. I found the offset spatula to be the easiest method.
- Return cakes to the refrigerator and allow to sit until the ganache is completely hardened.
- Enjoy!


I. DIE.
Seriously? Can I move in with you?
WOW! These look amazing! the sponge alone looks incredible not to mention all those amazing toppings and fillings!
Seriously? I just want to eat my computer screen! These will be appearing in our home soon. Pinned!
Erin, thanks so much for linking up to Tasty Thursdays. I could resist this amazing recipe and have featured it today on my Facebook page.
Thanks, Nichi
I wish there was a print version
There will be, soon. I am retyping all of my recipes one by one and it’s a lengthy process. I hope to have them all done by the end of October 2013.
LOL! Look scrumptious! BUT that being said, my days for long processes in the kitchen are done, LOL! So I think I will just take this and divide both cakes into 2 halves and use the marshmallow creme between all 4 layers, then frost! Not as pretty but sure will be kinder on my disabled legs! Thanks for the recipes! I bet they will taste great.
Looking for the “Print” icon and can’t find one? Just RIGHT click in the white and when the little box pops up select print. Works on most pages. If you don’t want the whole page select (highlight) the section you want to print and RIGHT click in the blue area you created; select “Print” and then select “selection” on the print options box- You may also find “Print” in the upper left corner of some browsers and other programs by clicking on FILE and selecting print. OR just highlight the recipe, right click on the blue area and paste it to your word program, email or notepad and print from there. So many ways to do this that it’s silly to complain that there isn’t a print feature.
Thanks for your feedback! I’m in the process of retyping all of my recipes to add the print feature and the recipe box feature, it’s just a lengthy process! I appreciate your help! 🙂