Smith Island Cake

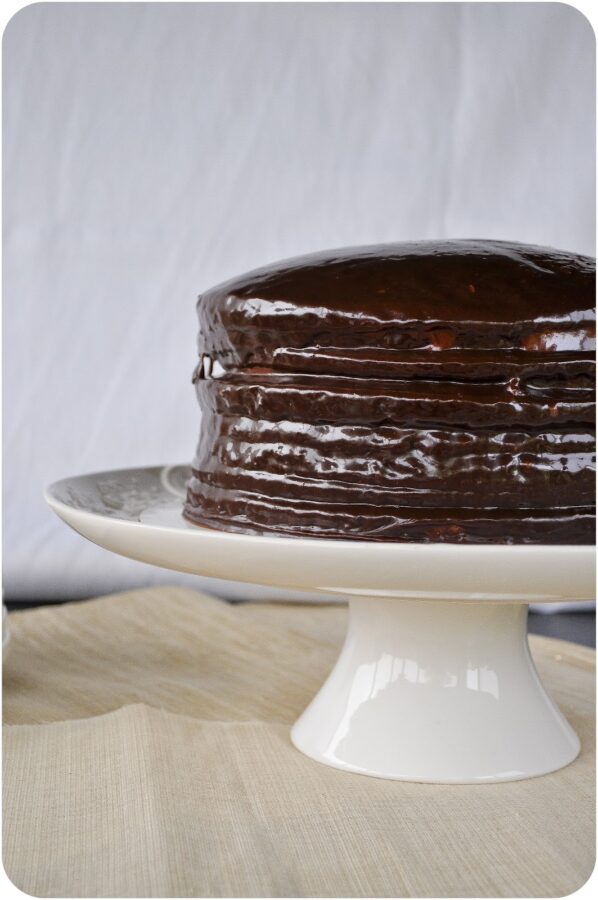
The Smith Island cake is now the official dessert of Maryland. {Smith Island is located off the shores of Maryland in the Chesapeake Bay.} The exact origins of the cake are unknown, although some speculate that it was brought into the area by settlers in the late 1600’s. Apparently it started as a four layer cake, but as time went on it became a sort of competition for bragging rights – the more layers you managed, the more awesome you were.
Sounds about right to me. Layers = awesomeness.
This cake has also become known as “frosting with cake.” That also sounds awesome to me.
I do have to say that this is officially my favorite frosting of all time. Given the amount of frosting I’ve tasted in years since this blog was born, that’s saying something. It’s smooth, it’s fudge-y, it’s sweet but not too sweet. It takes like fudge on a hot-fudge sundae.
In fact, it’s a good thing I don’t have any ice cream in the house, because there’s a good chance I would have abandoned the cake idea and just made myself a big old hot fudge sundae instead.
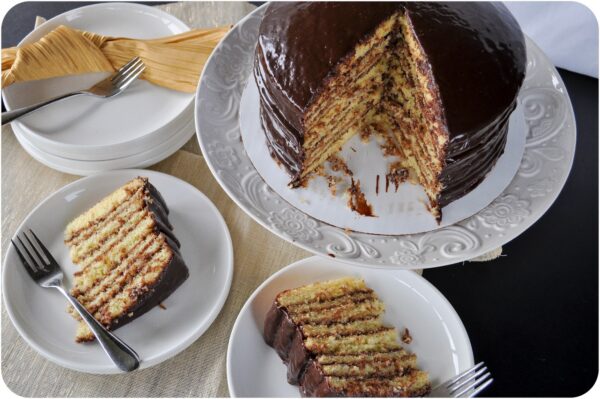
While this cake is definitely time consuming, it’s really not difficult, there are just a lot of steps. You’ll want to make sure you have at least four 8 or 9-inch round baking pans, it will make the process go much faster. These layers are very thin, so take the extra time to lay some parchment in the bottom of the pans to save yourself some time and stress when removing them.
Have you ever had a Smith Island Cake before? Let me know what you thought about it!
Enjoy!
Smith Island Cake
Yield: 10-12 servings
Prep Time (including frosting): 90 minutes ♦ Bake Time: 30 minutes
Cake Ingredients:
- 24 Tablespoons unsalted butter, melted
- 3 1/2 cups flour
- 4 teaspoons baking powder
- 1 and 1/2 teaspoons. kosher salt
- 2 and 1/4 cups sugar
- 2 cups milk
- 1 Tablespoon vanilla extract
- 6 eggs
Icing Ingredients:
- 2 ounces unsweetened chocolate, chopped
- 2 ounces semisweet chocolate, chopped
- 2 cups sugar
- 1 cup evaporated milk
- 6 Tablespoons unsalted butter, melted
- 2 teaspoons vanilla extract
Directions:
In a large bowl, whisk together flour, baking powder and salt. Set aside. In another large bowl, combine melted butter, sugar, milk, vanilla and eggs. Whisk to combine. Then, pour the wet ingredients into the dry ingredients and whisk together until just combined. Don’t over mix. Allow batter to sit for 15 minutes, then stir until smooth.
You will now bake two sets of four cakes. Using half of the batter, divide it evenly among the four prepared pans. Tilt the pans to spread it around the pan, or use a small offset spatula to spread it around. Bake for 15 minutes or until just barely browned. Remove from oven and allow cakes to cool for 20 minutes, then carefully remove them from the pans and allow to cool completely on a wire rack. Clean, dry and re-flour the pans, then divide the remaining batter among pans and repeat the baking process.
While the cakes are cooling, make the icing. In a medium, heavy-bottomed saucepan over medium-low heat, melt the butter. Add the sugar, chocolate, and evaporated milk and stir to combine. Bring the mixture to a boil and stir frequently until the sugar dissolves and the icing becomes smooth and shiny. This will take about 8 minutes. Remove from heat and stir in vanilla. Let the icing sit until it’s thick enough to spread, about 30 minutes.
To assemble cake, place one cake on a cake stand and, using an offset spatula, spread with about 1/4 cup of icing. Repeat with remaining cakes, leaving top cake un-iced. Chill cake to set icing between cakes, about 30 minutes. Rewarm remaining icing, if necessary, and spread over top and sides of the cake; let icing cool before serving.
Recipe Source: Saveur